Christmas Countdown Clock Widget

Are You Ready To Take The Challenge??

Join Elliemook's November challenge for your chance to win shopping vouchers for our store! All the deets are here

Join our followers & be entered into a random prize drawing on December 1st. Check it out!!!

Thursday 31 January 2008

Eye of the tiger


This LO is a fab way to use up scraps of paper. I used scraps from the HOTP Boys to men busy scrappers solution papers.


First I took a piece of plain beige paper, inked the edges and then stuck it to the centre of a piece of brown cardstock. I then tore random strips from the different patterned papers, inked the edges with a chestnut roan fluid chalk ink pad and randomly stuck them down to the left hand side. I matted the photo onto some plain brown paper, again with torn and ink edges, then added 3 brads from the HOTP masculine embellishabilities.


The title was stamped with A Muse alphabet stamps and then cut out. I then added some journalling and doodling with a brown fineliner. Finally I swept a cream ink pad around the edge of the LO.


Don't forget there's still time to take part in my challenge this week to use EYELETS - you can find all the details in this post.

Wednesday 30 January 2008

Meet My Mojo!

We all talk about our mojo's but have you ever tried to imagine what yours would look like in a physical form? Well, on one of sleepless nights I did and this is my mojo!!
And what's great is he matches perfectly with the lushious Renae's House Aubrey papers!!! I even posed him for the picture sat on the Aubrey Garden paper! For this LO I used a piece of plain pink cardstock and a sheet of Aubrey Floral as this paper is double sided I cut a strip from one side to put down the left side of my page and cut those rather stunning flowers and swirls from the other side. I also used the Aubrey Surprise to matt the photo and for the panel underneath the picture which pulls out with my journalling on. The title was die cut from several layers of cardtock and piled up to give a chipboard effect and covered in some left over scraps, a couple of bits of American Crafts ribbon and presto! Job Done!
For those of you still with me or are interested here's my journalling;
"OK, So why on earth do I have a picture of a blue, fluffy thing in my treasured scrapbook? It's my mojo! Or at least what I picture my mojo to look like in physical form!! My mojo is my inspiration, creativity and motivation to make my pages as good as I can. My inspiration comes from patterned papers, magazines, gallerys, sketches and my imagination. My creativity is (I hope) natural but this is how I choose to use it and my motivation comes because this is what I love to do. So I love my mojo and it's cute representation, it even makes funny noises, like me trying to use a stubborn paper punch!!"

Okay, I know I'm nuts but I loved doing this page! LOL!

Tuesday 29 January 2008

Mother's Day & New Home

Hello, well Mother's Day comes early this year on 2nd March so I thought I'd do mine early!

Here's a little pressie idea, a plant pot decoration. So easy to do you could get your children to make it. I found an old plastic drinking straw and decorated it. First I cut out some flowers using the friendly felt . As I'm not too good at drawing I used some chipboard flowers to act as a stencil. For the leaves I used a template free from the net. To add a bit of decoration I threaded some ribbon through one of the buttons that I had from a big bag of buttons that you can get from the Crop til you Drop webshop. And what a bargain!! A bag of buttons for only £1!! To the "stalk" I added more ribbon and a "Happy Mother's Day" which I printed off from my computer.

My second piece is a Mother's Day card. I had to use the Vintage Sara Papers from Hot Off The Press again for this one. They are so right for this sort of card. So I covered the card blank in the papers, tearing a co-ordinationg piece to add to the right side and also some little corners. To the corners I added the little star shapes. In the middle I used two big blooms held together with a big brad. The "MUM" was made by sponging distress inks onto vellum letters.


My third piece is a "New Home"card. I used the American Crafts papers to cover the card, adding a strip of co-ordinating paper to the side. The little house was just right so that went into the centre and then I added some buttons for a bit of dimension. Finally the "New Home" was printed out on my computer and layered onto some card.

Saturday 26 January 2008

Challenge #26


My turn to challenge you all again, and this week I want to see your EYELETS!

It can be any sort of project you like as long as it includes eyelets somewhere - and no you don't have to use as many as I did! LOL (thank goodness for crop-a-diles is all I can say!!)

For this layout I used the Dovecraft BRIGHTS eyelets, but there are tons of different ones in the webshop, and if you want to stock up you can find them all here.

The buttons I used are HERE and these fabby little bags are such good value that I used tons on this layout without batting an eyelid!

So, get those eyelets and setters out and off you go!! Don't forget to leave us a comment so we know you've done the challenge, and then email a picture of your project to sales@croptilyoudrop.co.uk so we can add it to the gallery - then at the end of the month the DT pick our fave and the winner gets a prize - so what are you waiting for?!

Thursday 24 January 2008

Scrapping with scraps!!

Hi Guys,

I'm thinking that everyone is a bit skint in Jan/Feb, just like me...so I've done some projects that literally do use the last scraps of my kit, to show just what you can achieve with not much stash!!

OK...umm...no laughing please ;-p This is my first school photo and yes...I do want to run and hide now!! lol

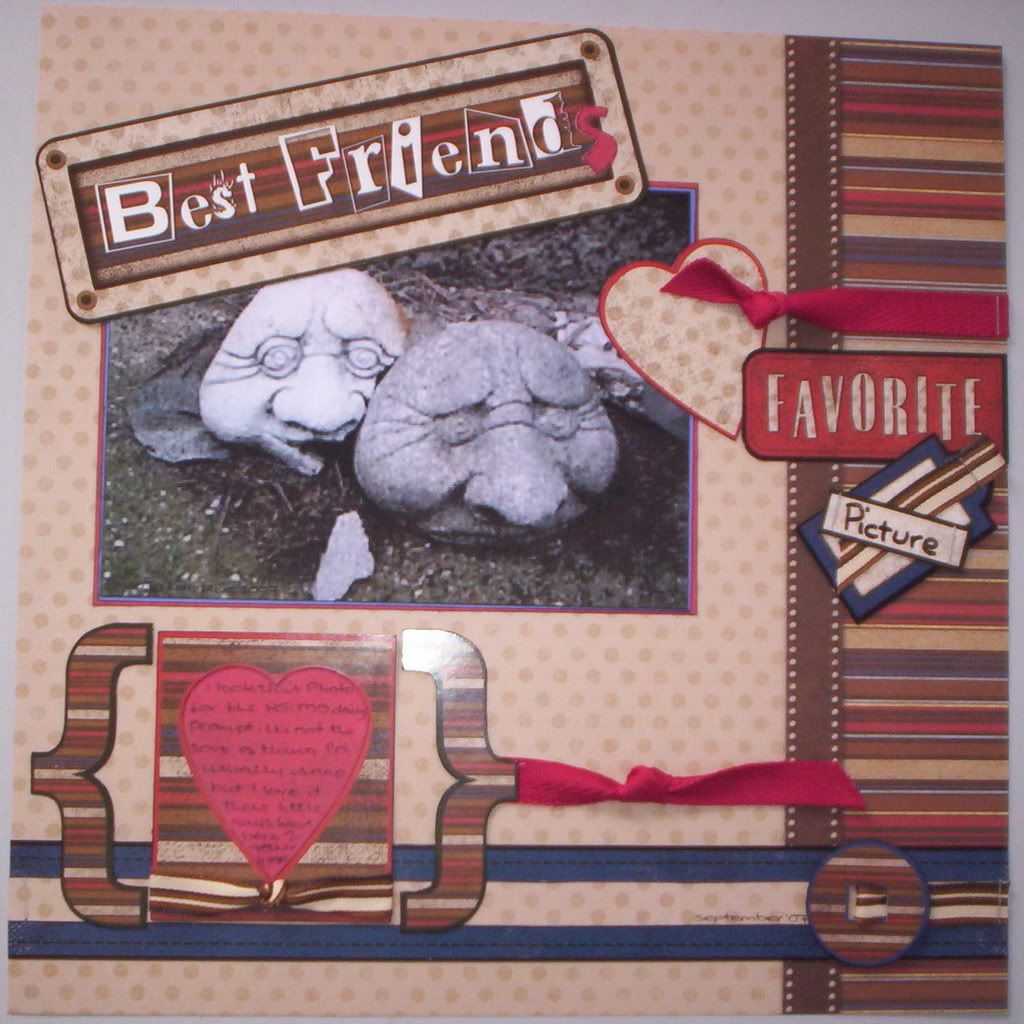
I've used the remnants of 4 sheets of American Crafts The Goods pp's and a sheet of plain purple cardstock. I've made my own embellishments out of Friendly Felt and a couple of brads. I've journalled with a white pen, using my non-dominant hand...which is all wobbly and reminiscent of my 4 year old writing! Finally, I've stamped a huge bracket and an exclamation mark {fromt the HOTP Thingamajig stamp set} in white to tie the papers and my stylish shirt together!

Et voila...something out of *nothing.*


This little card really does use the scraps! If anyone remembers the Advent Calendar I made back in November...well the felt frame on this card is made by cutting around the waste from the title letters which I cut using a friend's Big Shot! I've embellished the frame with more felt, some butterflies, a circle and 2 different flowers all of which I punched out using regular punches. However please do be careful...in my enthusiastic jumping up and down to punch through the felt...I did break one of my punches!!! Ooooops! Finally, I added a jewel brad to the flower and inked the edges all the way around. Job done!

Finally, I've used the remnants of all those yummy sheets of Friendly Felt...did any of you notice just how much I loved this stuff!! I've made an assortment of embellishments ready for my next projects...very handy when you're in a bit of a hurry to have something ready made!

I hope you like what I've done? Do leave me a comment to let me know...and E-mail Beverley for any of these productts...apart from that...happy *scrapping*...and see you again soon! :)

Tuesday 22 January 2008

A Vintage Set

My turn again and today I'm showing you a vintage set comprising of a tag, a door hanger and an ATC.

For this tag I cut out the basic tag shape from some card and covered it with the lovely Sara's vintage papers from HOTP. The little piece at the bottom is black glimmer paper torn and decorated with a fabric sticker and some ribbon and the vintage looking button. The dog check fabric square in the middle is also a fabric sticker. I added some little corner pieces by cutting out triangles from some of the vintage papers. The little stars are also from HOTP.


The door hanger is along the same lines again I covered the hanger shape with the lovely Sara vintage papers. Everything is made by HOTP bar the little charm . To add a vintagey feel I sanded the white button and the brads. I tied the little grandfather clock charm to some ribbon and then added it to the hook.


And finally the ATC. Again covered in the Sara's vintage papers with some torn corners. The little tag is also in the vintage paper range. I added the little stop watch charm with some ribbon. Then to finish off I added "wish" which is another HOTP product.


If you would like to buy any of these products you can email Beverley at sales@croptilyoudrop.co.uk as they aren't showing on the web shop at the moment.

Monday 21 January 2008

I'm in the mood for LOVE!


Yep, I've been thinking about Valentine's day already. If you want to send that special someone a card to tell them how you feel, here's a few ideas for you.


I've made all these cards using the gorgeous papers from the February 2007 HOTP Personal Shopper kit. (These aren't in the webshop at the moment, so email Beverley at sales@croptilyoudrop.co.uk if you'd like one).


For the last card I also used some of the fabby Friendly Felt (which is on an amazingly cheap bulk offer in the webshop!) I cut out some heart shapes, and then stitched some buttons onto them.


Don't forget to check out Ruth's fabby challenge this week - it's great fun and will really get those creative juices flowing!!

and the winner is...

the winner of last month's competition...is...Katy! Check out the winning LO here
well done you...and your yummy prize will be with you asap.
don't forget to enter the weekly challenges this month...to be in with a chance of winning next month's prize.

Friday 18 January 2008

Slightly Different Cards


Today I'm showing you a different style of card called a "kick stand" card using the gorgeous Creative Imaginations papers.

This first one is a "girly" card with a gardening theme. The front of the card has been covered with one side of the Renae's House paper, as has the scallop. The inside of the card has been covered with the other side of the paper as they are double sided papers. I added a bow to the top half of the card using the lovely blue spotty ribbon. On the scallop I added the gardening charms and to tie it all together I again used the blue ribbon. The second photo shows how the card stands.

The theme for the second card is more masculine and is "travel". Again I made a kick stand card. I covered the front of the card with Bo Bunny Homespun Holidays paper. I added ribbon to the top of the card and also to the rectangle standing piece of the card.
I then attached the travel charms with some more ribbon and some tiny brads.
The inside of the card was made using the Bo Bunny Jack Frost papers.

Just a bit of a variation to the normal style of cards. :-)

Wednesday 16 January 2008

Have you got a *buddy*?

Have you tried the HOTP Brad Buddies yet? There is a buddy for every occasion...they are yummy lightweight metal embellishments and they attach to your LO's with brads. Easy peasy...which works for me! lol
For obvious reasons, I've used the Graduation selection on this LO...but there are all sorts of themes, just e-mail Beverley if you want them :)


This LO also used several sheets of HOTP paper, including the stunning shimmer paper {used in blue here but it does come in other lovely colours too...again...e-mail Beverly if you're interested! Other than that, I've used basic cardstock and a journalling pen.
So what are you waiting for? Get yourself a buddy...and get crafting together! :)

Tuesday 15 January 2008

Loving Aubrey!


Yep, I am TOTALLY in love with the Renae's House Aubrey Range from Creative Imaginations! Check them out in the webshop HERE and I guarantee you'll love 'em too!


I've used the papers, chipboard, cardstock stickers and brads for these 2 projects.


First up, a clipboard that I bought ages ago in the poundshop. First I painted round the edges with some purple acrylic paint. Then used the Floral paper to cover the front. I added a strip of the reverse of the Surprise paper to the bottom and added a chipboard flower and a cardstock sticker. I then added some scraps of ribbon to the clip, and added a notepad.


Then, with the scraps of paper I made the card. I covered the card blank with the Surprise paper and added a strip of the reverse side (the stripes) and a strip of the Floral paper. I then added a Heidi Swapp bloom with one of the Aubrey brads in the centre.


Don't forget to check out the webshop to see some of the other gorgeous new paper ranges!

Saturday 12 January 2008

Challenge 24!

Hi Everyone,

Its *that time* again...time to set a lovely new Challenge! This week I am thinking all about the New Year and new possibilities...so I challenge you to do something new...anything new! This is a very open challenge, you could try a new technique, use a new product, try a new craft...or even just use a new colour {one you usually avoid makes for an interesting challenge!!}

To get you started I've done a few *new* things myself:

I've tried my had at box making and I'm really pleased with the results! I've made this little cutie out of friendly felt {which is on an amazing special offer in the webshop}, embroidery thread and a button.


Thinking about what other new ideas I could conjure up for this yummy felt...I hit upon the idea of making a little giftbag {I am always short of these and I love them because they are so much more fun than wrapping paper.}


All thats left now is for you to show me your creations. Remember this challenge is open to all types of paper crafter...cardmakers {maybe use a new sketch}, scrapbookers {maybe try a new technique} and I think this time we'd better include general crafters too {as my examples use no fabric...why should yours!! lol}

As usual send your entries by e-mail and be sure to post a comment so that we all know to go and see what you've done! There is a fabulous prize awarded at the end of the month to the favourite entry as judged by the DT...so go on...I bet we'll love what you do!!

Thursday 10 January 2008

A non-Christmassy project


I don't know about you, but I'm beginning to get fed up with Christmassy projects! Mainly because I'm love Christmas, and don't want reminding that it's all over for another year! And as the weather is generally grey, dark, foul and miserable I thought a nice bright project might cheer us all up a bit!


All the supplies for this LO came from the September 07 Personal Shopper kit, which includes the Use 'em for anything pastel papers, monograms, blossoms and brads, and some ribbons. I love these gorgeous pastel shades and they were just perfect for this picture of my mum and future MIL - and the perfect excuse to use loads of flowers! LOL


Don't forget, there's still time to take part in Charli's sketch challenge - the new challenge goes up at 6pm on Saturday - and you could win yourself a fabby stashy prize!

Wednesday 9 January 2008

Welcome to 2008 from Alix!!!

Hi there everyone! Hope you all had a wonderful Christmas and New Year...I have high hopes for 2008 {I'm getting married in July}...and I wish that all of you get your dreams come true this year too!

Today I've got a double layout to share, of my family and me at Christmas. I've used the Dec 2006 HOTP PS Kit. If you haven't tried any of these kits yet...make it your New Year's Resolution...they are super and well worth the money. From this kit I've used the pp's, the giant ric rak, the acetate tabs, and the plain cardstock. I've also used the HOTP Thingamajigs stamps (the gold stars) and the HOTP block letters.
Everything is available from the shop...just e-mail Beverley and she'll sort it out for you :)


For anyone who might be wondering...I'm the one in the fabulous Christmas cardi!! lol

Do remember to enter this week's Challenge and to check out the new webshop...there is some awesome new stuff...and some fabulous 60% off bargains to be had!!

Have a wonderful week x

Saturday 5 January 2008

Challenge # 23

Hello folks! Hope everyone has had a fab Christmas and a great start to the new year! This here, is challenge # 23, a 8.5 x 11 LO sketch. I dont do this size scrapping much so it was a welcome change - hope you enjoy it! As always, feel free to flip, reverse or interpret it any way you will. It would work pretty well as an ATC or a card too maybe, would love to see what everyone comes up with.
Here is my interpretation of it, created using the Vintage Sarapapers available from the Crop Til You Drop webshop. I cut the title and the photo mat from Bo Bunny winter papers but thought they complemented the blues in the layout, and you cant tell they're wintery/christmassy papers!

So good luck folks - dont forget to email your entries into sales@croptilyoudrop.co.uk to be in with a chance of winning our monthly competition, judged by the design team! Leave a comment on this post so we'll know you have entered and we can pop over to the gallery here to have a look! And dont forget to check back daily to see more of what the DT have been creating!


Thursday 3 January 2008

Happy New Year!


As I'm lucky enough to get the first post of the year I would like to wish you all a Happy New Year! The rest of the Design Team and myself are really looking forward to providing you with lots more projects this year, so don't forget to check back every day to see what we've been up to, and Saturday's at 6pm when the weekly challenges go up!!


Well, now Christmas is over I don't want to see another card until at least October LOL! But I have started scrapping my Christmas pictures which is great fun.


For this Layout I used some scraps of the Bo Bunny Homespun Holidays papers, and a strip of friendly felt, on which I drew and hand cut a scalloped edge. The ribbons are from the HOTP December 06 Personal Shopper kit, as are the great big brads. The chipboard button was painted with white acrylic paint and I then sponged some black ink over the top very lightly. I then cut a scalloped square from white cardstock and drew on some rough lines and added my journalling, then finished off with some doodling around the edge of the Layout.