
The Guv, Looby, Shary, Charli, KTP, Alix and Ruth would like to wish you all a very Merry Christmas and a Happy New Year!!!
We hope you have enjoyed this last year with Blog 'Til You Drop and we hope you will join us in the New Year for more fun!
Wishing you all a wonderful time, see you back here on 2nd January!!
Christmas Countdown Clock Widget
Monday, 24 December 2007
Saturday, 22 December 2007
Challenge #22 - New Beginnings
 Today was our last day at the B&M store, which closed its doors for the very last time at 4pm. So I'm thinking about new challenges, new paths & new direction. I have friends who have moved into a new home today (how brave this close to Christmas! LOL) & I also know of several babies born this month (all girls, I always wanted a pink one too!) Of course we are fast approaching a new year as well - who knows what delights that might bring!
So the challenge for this week is simply this: NEW
Show us 'new' in any craft form you like: layouts of all sizes, mini books, ATCs, FLAPs, inchies, quilting, cross stitch or whatever else floats your boat.
My card was made with HOTP Cardmakers Creative Pack & Ribbons (Classic) & chipboard from Fancy Pants Biggest Board (Dreamer) - made really easy with a sketch from Di Hickman. All the deets & links to Di's challenges are over on my blog.
As always, e-mail your entry to me & post a li'l comment here so as everyone knows to go look in the gallery. There'll be a prize at the end of the month for the overall winner from all December's entries as chosen by our DT.
Good luck!!
Thursday, 20 December 2007
Last Minute cards


If you haven't yet finished all those Christmas cards, and are getting stressed, here's some really quick and easy cards for you to try.
All of these cards have been made using the HOTP Personal Shopper kit, November 2007 and some A Muse sentiment stamps. The kit contains a full Finished in a flash Christmas kit, a set of Christmas brad buddies and silk poinsettias and loads of yummy patterned paper. I used nothing but the kit, and having made these 6 cards I still have LOADS left for all those Christmas pics we're bound to take!
Well, that's it from me for this year, so I hope you all have a wonderful Christmas and I'll see you in the new year!
Saturday, 15 December 2007
Challenge # 21 - A stitch in time.....
Hi guys and welcome to this weeks challenge!!
Charli here - and my challenge to you this week is to use sewing on your projects!
Now in case you're like our Looby, and you're not keen on sewing - fear not!! The sewing or stitching could be real, doodled, rub on, or could be already on your paper as it is on the next LO I'll show you. First though, my really really stitched on LO, using the vintage sarapapers available from Bev at this email address - sales@croptilyoudrop.co.uk
I made my own flower petal template, cut round it a few times using different papers from the vintage sarapapers kit, then used a zig zag stitch to attach them to the page. I sewed a border around the page and made my own little tag with the quote on, also using papers from the kit, and a bit of stitching on too. I also added some tiny metal flower shaped embellies on the tag too. Added some button brads, and a naked chipboard button, painted pink and jazzed up with a little bit of ribbon.
 Next LO - not a real bit of stitching in sight!! Used the English paper company collection of Christmas papers on this one, but just cut out the Christmas squares as my pic was not Christmas related!! Cut the title out of the same papers et voila!
So come on - have a go!! You could win yourself some fabulous goodies - email your entries to the above email address, and leave a comment here to let us know you have entered - then we can all have a peep!
Happy crafting to you folks!
Friday, 14 December 2007
Last minute Christmas makes...
If you are anything like me, you'll be running out of time about now...and realizing that all those great plans you made...are just not going to all happen in time...Fret not...here are some quick ideas that you will have time for...and one of them even reduces the amount of washing up you'll have to do!! lol

This card can be made in about 10 minutes and is suitable for both a male or female relative. You could also change the message and make it suitable for pretty much any occassion too - you can't ask more than that, can you?
I've stamped and embossed a paisley design in black embossing powder 5 times onto the front of a silver card blank. I've embossed one of the chipboard blanks with silver sparkle embossing powder and mounted it over the middle motif. I've then attached one of the HOTP Word  Fragments atop this with foam pads. Finally, I've tied black ribbon from the HOTP Classic Collection around the spine and with DSST across the two right-hand corners. Job Done!
 Fragments atop this with foam pads. Finally, I've tied black ribbon from the HOTP Classic Collection around the spine and with DSST across the two right-hand corners. Job Done!
My second project for today is these rather useful glass charms. They help guests {tipsy or otherwise...} to remember which glass is theirs...so they are not always reaching for a clean one...and you get to do less washing up!!! Yay :)
Very simple to make, I've taken a selection of the Charms and attached each one to one of the HOTP Spiral Clips and tied this onto the stems of my glasses with some of the soft black ribbon from the HOTP Classic Collection. I think they look quite smart...and they even allow you to make a little comment on the personality of each person... For example...my glass would be the Champagne charm...Mum's would be the watering can, FIL's would be the tractor...and OH's would be...

Thursday, 13 December 2007
18 Days Til 2008!!!
Can you believe how fast this year has gone??
But in preparation for next year I have made a little desktop calendar!
.JPG)

.jpg)
For it used some of those wonderful Jumbo playing cards, and it works out really well, with 13 cards in a suit, you get the 12 months and a front cover, so that's 4 calendars from one pack of cards! BARGAIN!
I decorated mine with some Vintage Sarapapers and a set of free calendar blanks which you can print off the internet! I used a Helix stencil and some punched out flowers for the cover and a couple of bookrings to join it all together, the best thing is though this cards are strong enough to support themselves so it is completely freestanding! (at least it will be til it gets buried on my desk!!)They are so quick and easy to make so they would be great for a last minute stocking filler!
 And secondly I am going to show off a little gift box I made, very simple using BoBunny Jack Frost Ornament Paper, I just loved this paper but I found it too busy to use a full sheet on my LO's so this was great way to use some of the paper up and still be left with enough to use elsewhere!
Wednesday, 12 December 2007
me again!!
Suprize, suprize...its me again!!!
And with the same yummy Bo Bunny papers! This time I've used the matching cardstock stickers too, and lots of ribbon from the HOTP Classic Collection, as well as 2 HOTP Really Big Brads and one of the lovely metal charms now in the shop!

Like dogs, these papers are not just for Christmas!! {hears groaning...lol}
I've made this page all about my fascination with fresh snow...and my urge to declare my feelings in it!!
I hope you like it...and do remember to enter this week's challenge, all the details are here.
Tuesday, 11 December 2007
Gotta lurve those decorations!!


We really go overboard with the decorations at Christmas so I decided to make a little mini book to record this year’s decorations.
I used papers from the Bo Bunny Homespun Holiday range as well as papers from the HOTP December 2006 Personal Shopper kit, all the brads, ribbons and overlays are also from this kit and the buttons are by Craftime.
I cut 8 scalloped squares (5” in size) and then decorated the pages with papers and embellies and added my photos and some doodling and journaling – mainly about where the decorations came from and when we bought them. For the title page I die cut the title (our house is referred to as “The Grotto” at Christmas!!) from the black cardstock, then drew over with a white gel pen. The back page (not shown) is just plain cardstock and I simply journalled about what dates we decorated this year, how long it took etc.
I then stuck all the pages back to back, so I ended up with 4 double-sided pages and bound them together with book rings.
All the products used for this project are still available, despite the webshop being down at the moment. Simply email Beverley at sales@croptilyoudrop.co.uk and she’ll be more than happy to help!
Saturday, 8 December 2007
Here it is...Challenge #20...
and this one is all about *wishes*.
You can make a LO {of any size}, a card, an altered item, whatever you like really {as long as you use some scrapping related products...} but the theme must be about something you *wish* for...or something you *wish* for someone else maybe?

My example is a 12x6 LO made from the yummy Bo Bunny Press Homespun Holidays collection spotty paper, some red glimmer paper by HOTP, red spotty ribbon by Bo Bunny, and red plain ribbon from the HOTP Classic Pack. I've also used one red HOTP brad {in the middle of my punched flower} and one large Blossom with a Button Brad in the middle. And of course my white pen...how did I ever scrap without it???
All these goodies are available from BEVERLEY by E-mail while the shop is unavailable in the usual way...and I know she'd be pleased as punch to hear from you!
Ok...so now you know the Challenge...get to it!!! Remember to e-mail your entries to us and to post in the comment section of this thread to let everyone know your entry is in the gallery!
I *wish* you all the best of luck and happy crafting!!
Friday, 7 December 2007
A Chrimbo LO!
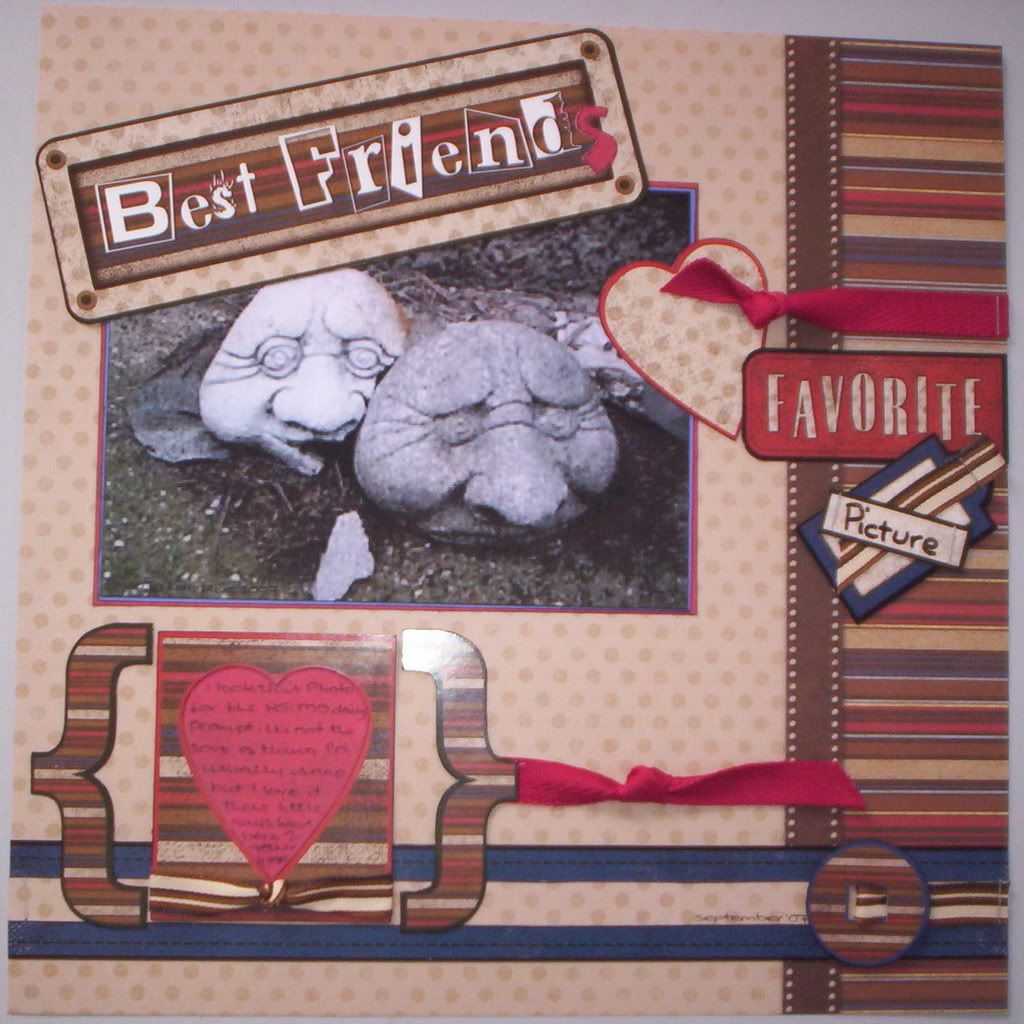
Hey guys! Its me again, just one project from me today - a page of me and my sis a couple of Christmases (?) ago.
I mixed and matched products on this LO. I used papers from the Personal shopper Dec 06 kit (which I believe is on offer at the moment!!) for the base, cutting a decorative border on the right hand side (that's for your challenge Phoenix!!!). Then I scrunched up the light green paper, unfolded it, then sanded it to get the distressed look. I used Bo Bunny Hot Cocoa paper for the heart - love love love these papers - they're double sided and they come in a fun range of colours and designs! I stamped around the heart using the Winter Swirls stamps. I used some ribbons from the classic cardmakers ribbon pack - I weaved some on the left and bottom sides of the LO and used the sewing machine to attach the criss cross underneath the title - sister sister - which I cut out using papers from the personal shopper Dec 06 kit.
I used a HOTP Big brad to attach the plastic tag word 'Christmas', with some of the ribbon from the classic cardmakers kit, and hand wrote the journalling onto some strips of the red papers from the kit.

I used a HOTP Big brad to attach the plastic tag word 'Christmas', with some of the ribbon from the classic cardmakers kit, and hand wrote the journalling onto some strips of the red papers from the kit.
And in case you're wondering, anyone who has looked closer at the LO and seen the journalling about the green hippo thing, I was wearing a green top, was pregnant at the time and ready for popping any second!!
Now the webshop is undergoing essential maintenance at the moment - as you can see from the above post there has been a slight techy problem, but it is being sorted as we speak! So for any orders please contact Beverley, the store owner on sales@croptilyoudrop.co.uk .
Have fun creating guys and dont forget - another challenge tomorrow! Be sure to stop by and check it out, enter and you could be in with a chance of winning some fabulous stash!
See you soon!
Wednesday, 5 December 2007
We have a winner!!
November's DT challenge had a clear winner - Sarah Carrington for her challenge #15 entry - 'fireworks'. Sarah, please e-mail me with your address & I'll get a yummy collection of goodies out to you.
Make sure y'all enter the weekly challenges this month for a chance to win another great prize!!
Make sure y'all enter the weekly challenges this month for a chance to win another great prize!!
This week I've been playing with the Dec 06 HOTP Personal Shopper kit...which I have to say...I absolutely adore :)
It contains all sorts of goodies, but I just couldn't resist this lovely little envelope card, which I'm going to send to my Mum {for Christmas, obviously!} It is so simple to do, the basic envelope card is printed onto the cardstock so all I had to do was cut it out and fold it up! I used the additional artwork to make a faux ribbon closure, secured with one of the greetings.

When you open the card and fold back the flaps it will stand up by itself,
and I decorated mine to look like this:
{All done using the PS kit.}
 Something else I'm adoring at the moment is the yummy paper ranges from Bo Bunny Press. This LO is made from 2 of the papers from the Jack Frost collection,
a sheet of red glimmer paper by HOTP and a sheet of red cardstock.
 All the products I've used are on special offer in the webshop atm...
so if you'd like any of them do e-mail Beverly, aka Guv,
to get yours while the webshop is down!
I'll be back on saturday with a new challenge for all you crafters out there...see you at 6pm!
Tuesday, 4 December 2007
Tuesday's Offerings

 Today I'm showing off a little box I made for my 4 year old daughter to put her doll stuff in. I covered a square box using the HOTP glimmer paper. For the lid I used the HOTP vintage paper. I added some gorgeous little "dance" brads and some flourish die cuts, which I made from the glimmer paper, to the lid. To finnish off I added a sheer purple ribbon around the sides of the box. Brilliant for a little girl to keep her small bits in so they don't get lost!
 My second piece is a 12x12 layout. Now I don't normally do much scrapbooking let alone 12x12 but the "marriage" transparency was just too fab not to use. So the 12x12 papers are again HOTP vintage papers. I used two different ones and to blend them in I put a piece of ribbon along the join. Attached to the ribbon are some little luck charms, one is a horseshoe and the other says " dreams come true". I backed the photo with the upper vintage paper and made some little contrasting corners. I wanted to keep it quite simple so I just added a big white bloom with a small heart brad and a little bit of ribbon. The transparency went over the top, attached with some mini brads in each corner.
Monday, 3 December 2007
A non-Christmassy project!


Now, I love Christmas as much as the next person (probably more!) but we all need a break sometimes, so here's a couple of non-Christmassy bits for you!
For this LO I used papers, tag and pocket and alphabet tiles from the HOTP Busy Scrappers Boys to Men papers book. The earthy tones and african theme were perfect for these pictures! This LO also qualifies for our weekly challenge as I've used some scalloped edges. The journalling is on the tag in the little pocket, to which I added a lion from the HOTP Zoo brad buddies pack.
With the scraps of paper and some of the other artwork I made this "Bon Voyage" card, which would be perfect for someone going on Safari (shame I don't know anyone who's going on a Safari anytime soon! LOL). I added a scrap of ribbon from my stash attached with a brad from the HOTP Masculine embellishabilities.
Unfortunately the webshop is down for maintenance at the moment, but as soon as it's up again I'll add links to the products I've used.
Friday, 30 November 2007
ATC's & Men
 Some nice and easy Christmas ATCs for you today. The first one is a snowflake ATC using the mid winter music paper. And with 25% off at the moment too! I added a little bit of ribbon to the left hand corner. I cut out some snowflakes using some scraps that I had left from a HOTP Christmas paper. The "Noel" comes from the HOTP Cardmaker's word fragments. And to finnish off I added a bit of sparkle using some glamour dust.
 The second one is using some HOTP Christmas 12 x 12 paper. I also added some Christmas transparencies across the stripes from the HOTP personal shopper - December monthly kit.
The kits are brill and with a whooping 50% off how can you resist? The little stars on top of the trees are from a Cardmaker's pack.
The third and final one is covered in paper from the 12x12 Bo Bunny Homespun range. I made a little tag with the same papers and added a little ribbon tag. The pocket is made with the reverse side of the Bo Bunny paper. Across the pocket I added some more transparencies. Along the right side I added a tag from the Bo Bunny cardstock stickers - Holiday range. The "celebrate" comes from the HOTP Cardmaker's word fragments.
 My second piece is a "Thanks Dad" card. I find it so difficult to make male themed cards but with these charms it was easy! So I used a DL card for this one and cut out some circle apertures. I then covered the card with the American crafts double sided cardstock. I used the reverse side with the plain cardstock to make the frames and the vine shapes. I tied a small amount of ribbon to the tool charms and hung them in the apertures. Just to finnish off I added brads to the top right and bottom left of the card.
I hope you enjoyed these and I'll be back on Tuesday!
Thursday, 29 November 2007
A couple of quickie cards!
 Its that time of year - as Looby said yesterday - so busy for a lot of us! So here are a couple of quick cards I made using some stuff from my kit, plus some gorgeous Winter Swirl stamps available at the Crop Til You Drop Webshop. The stamps are so versatile - I have a few different sets of swirly type stamps, but as soon as I saw these stamps, I thought - gotta have em! The swirls are really elegant, and one has some gorgeous little snowflakes on. The pic of my Christmas card doesnt really do the stamps justice at all - you get a nice clear and crisp image - I decided to do something a little different using a resist technique on this first card. You can achieve similar results by randomly stamping onto a piece of card and embossing with clear powder (in fact you could use any colour, just bear in mind that whatever colour you use will be visible after you have inked over it!). Then ink over with your chosen final colour. This technique works particularly well with gloss card. I added the chipboard frame after painting it with red acrylic paint, then giving a quick coat of clear glue like these here, to give a shiny finish. Added a little red wire heart and some ribbon, matted and layered onto a red card and hey presto! Oh not forgetting the snowflake brads, snowflake border overlay and that gorgeous little glittery red heart - I hope our Guv will step in here to pop in where I can find that though because I have hunted high and low and cant find it! Check out our Guv's blog for some more fab ideas for the winter swirls too!
Next is this little card for my brother's birthday next week! For this I used the busy scrappers boys to men paper pack - and all the letter tiles and little star embellies that come with it. The only thing I used that wasnt in the pack was the little brad buddie present that you see to the right of the card, but I thought it went well with the colours of the card (after I inked it up with blue ink!) and added the little red bow!
So thats all folks - if you invest in anything over the Christmas crafty season though (apart from all the fab paper and other crafty bits on offer at the webshop!!) I would definitely get my hands on some of the winter swirls stamps (PS why not take advantage of this fab offer and subscribe to the stamps only kit?? There's a freebie in it for ya, check it out!!) - they're not just for Christmas you know - they're for life! Lol have fun creating!
Edited by the Guv to say: more than happy to jump in and solve the mystery of the missing red glittery heart! LOL. They are actually in this mixed pack of buttons & flatbacks. HTH
Wednesday, 28 November 2007
Quick and Simple!
This time of year is soooo hectic, that we need to make life a little easier on ourselves! So here's some really quick and easy projects for you.

For this first card I covered the card blank in this Bo Bunny Jack Frost paper and, I then matted a smaller piece onto cardstock from this pack and mounted on the card. I then die cut some snowflakes from the scrap paper and card and added an overlay greeting from the December 06 Personal Shopper kit

For this second card I covered the card blank with the reverse of this Bo Bunny Homespun holiday paper and then added a mat of this Bo Bunny paper. The ribbons are from the December 06 Personal Shopper kit, as is the sentiment in the centre of the Bazzill flower.

The final card was also covered in the reverse of this Bo Bunny paper and I then punched 3 circles with this Marvy punch on the right side of the same paper. I punched 3 smaller circles from the reverse of this Bo Bunny paper and added a HOTP Christmas brad to the centre of each. I put a strip of this paper down the middle and mounted the circles with foam tape. The sentiment is from the December 06 Personal Shopper kit.

And finally, the simplest project of all! I had this acetate pillow box hanging around at home, but you can find lots of templates on the internet to make your own. I simply wrapped round a strip of paper from the December 06 Personal Shopper kit, added an overlay greeting from the same kit and then wrapped with some ribbon - easy peasy!
Don't forget - there's still time to enter Challenge #18 - and you could win a fabby prize!
For this first card I covered the card blank in this Bo Bunny Jack Frost paper and, I then matted a smaller piece onto cardstock from this pack and mounted on the card. I then die cut some snowflakes from the scrap paper and card and added an overlay greeting from the December 06 Personal Shopper kit
For this second card I covered the card blank with the reverse of this Bo Bunny Homespun holiday paper and then added a mat of this Bo Bunny paper. The ribbons are from the December 06 Personal Shopper kit, as is the sentiment in the centre of the Bazzill flower.
The final card was also covered in the reverse of this Bo Bunny paper and I then punched 3 circles with this Marvy punch on the right side of the same paper. I punched 3 smaller circles from the reverse of this Bo Bunny paper and added a HOTP Christmas brad to the centre of each. I put a strip of this paper down the middle and mounted the circles with foam tape. The sentiment is from the December 06 Personal Shopper kit.
And finally, the simplest project of all! I had this acetate pillow box hanging around at home, but you can find lots of templates on the internet to make your own. I simply wrapped round a strip of paper from the December 06 Personal Shopper kit, added an overlay greeting from the same kit and then wrapped with some ribbon - easy peasy!
Don't forget - there's still time to enter Challenge #18 - and you could win a fabby prize!
Tuesday, 27 November 2007
Gift bags & baubles

Hi it's me again. This time I made two little gift bags, ideal for little trinkets or sweets. I used the HOTP Busy Scrappers Solutions - Christmas pad for these. I cut the bags out of the papers and then added some Christmas transparencies from the December 06 HOTP monthly kit. The kit is in the Crop til you Drop webshop now with 50% off! The brads are also from the HOTP range. To finnish the bags off I attached some ribbon with a brad to the handle.

My second piece is a bauble to hang on your Christmas tree. I cut out scalloped circles with the gorgeous Bo Bunny Jack Frost shimmer papers. Then scored a triangle on each circle and then folded and glued them together. To be able to hang them I attached some ribbon and painted the tiny cotton reels with some gold paint. A great ornament that the kids could make too!!
Monday, 26 November 2007
Friendly felt and child-friendly projects!!

Hi Guys!! Check out the frame above! Its made from the stiffened friendly felt which holds its shape, and I've die-cut the swirls and flowers, hand-cut the leaves and stitched on the leaf detail by hand. The flower centres are brads. Its sooo easy to make, super as a gift idea, and all you need is 3 different colours of the felt...so i reckon you could make 4 for just over £1.50!!! That is what i call a bargain :D Mine is super bright...but the felt comes in all sorts of colours {check them out here} so you could easily adapt it to suit tastes/decor. I've even stitched a small loop on the back so it can be hung on the wall...

These little ornaments are also made from the felt, and are a super project to do with the kids on a soggy/bored/argumentative day! Simply cut your chosen shape out of the felt, and decorate with brads, more felt shapes, buttons, blooms or eyelets. Tie with a ribbon and hang on the tree/attach to school bags/bedknobs/totes/etc. The felt is so versatile, you can even use your cropodile on it!!
Next time I have more paper-based crafting to share...but for now...I just can't use anything else. Wonder if I can get a job as a felt-crafter anywhere?? ;-)
Next time I have more paper-based crafting to share...but for now...I just can't use anything else. Wonder if I can get a job as a felt-crafter anywhere?? ;-)
Saturday, 24 November 2007
Challenge # 18 - Celebrations!
Welcome to our lastest challenge!
Shary has kindly agreed to post this up for me as it's my birthday tomorrow, so I'm out on the town tonight!!
And, coincidentally, my birthday has prompted the theme for this week's challenge - CELEBRATIONS!
So we want you to create a LO, card or whatever else you want on the theme of celebrations - so a nice big scope this week!
Don't forget to leave a comment, so we know you've completed your challenge and email it to sales@croptilyoudrop.co.uk for inclusion in our gallery. This week is your last chance to enter November's challenge competition - you may win a fabby prize!!
A couple of ideas to get you going:
 For this LO I used the Bo Bunny Homespun holiday papers. The Christmas tree was cut from Friendly felt (this amazing stuff is pre-stiffened so it cuts like a dream!) I then added a friendly felt star and some Bo Bunny ribbons and some buttons. I painted these mini cotton reels with red acrylic paint and then wrote the letters on them to spell Christmas. I threaded them on to ribbon, set some eyelets into the tree and threaded them through.
 This card was made using the HOTP Citrus Creative Pack and Instant card art and Ribbons. The parcel was cut from friendly felt.
Enjoy the challenge - can't wait to see what you come up with!
Looby x
Friday, 23 November 2007
Oh I wish it could be Christmas.....
 Mind you if it was Christmas every day I would need a bigger book for all my journalling! This is my latest project with my kit. I was thinking of making an advent calendar with my Bo Bunny Advent paper, but Alix already made a fab one here, so I thought I would try and do something a bit different with mine. So I though - why not make a Christmas Journal and use the numbered squares to date the pages? So that's what I did!
 And also - it gave me another excuse to use some of this fab and very friendly felt again - this time for the covers of my book. I just did a rough drawing of the Christmas tree and cut it out, and then set eyelets into it, and tied a bit of ribbon around for tinsel - which I also added to the book rings that I held it together with. The ribbon is from the classic cardmakers ribbon pack from HOTP, and comes packed full of cool coordinating Christmas colours. I then pierced a couple of designs - the lime green border and the red shape in the corner and stitched into the felt. Added a star brad to the top!

As you can see here - I cut out the squares from the Bo Bunny paper (advent) and stuck them back to back on each page (also Bo Bunny Papers, I used Frost and Ornament - fab papers and double sided!!). The Advent papers also come with some really cute Christmas art on them - great for embellishing your projects - I'm going to use them to add to the completed pages. These papers have a 20% discount on them at the moment so its well worth popping over and having a good old shop (lots of other bargains and discounts to be found too ;o)!

As you can see here - I cut out the squares from the Bo Bunny paper (advent) and stuck them back to back on each page (also Bo Bunny Papers, I used Frost and Ornament - fab papers and double sided!!). The Advent papers also come with some really cute Christmas art on them - great for embellishing your projects - I'm going to use them to add to the completed pages. These papers have a 20% discount on them at the moment so its well worth popping over and having a good old shop (lots of other bargains and discounts to be found too ;o)!
I'm going to take a pic of my son each day leading up to Christmas day, and write a little bit about each day now he's starting to take more notice of it all.
Hope you like it - why not make your own Christmas Journal?
Oky doky guys I shall see you next Thursday when I post my next project - but don't forget - its challenge night tomorrow - and there's some fabby prizes up for grabs!! You'd be mad to miss it!!
Thursday, 22 November 2007
Its a Gift!
Hello again guys! Hope you've all been busy crafting away..? I've been working on a couple of gifts this week...very handy at this time of year...I hope you like them!
Firstly, I've made another wall hanging {I don't seem to be able to stop making these atm!} but this time, I've made it as a Christmas card alternative to send to my relative in New Zealand {hence the tag on the bottom which says *love from England*}.
 The base for this hanging is the left-overs of a sheet of Buck Naked Chipboard Shapes which I've covered with the gorgeous stripey HOTP Christmas paper from this amazing kit {now half-price!!!} I've used the matching ribbons, and some of the HOTP cardmakers' word fragments. The middle section is cut from the HOTP frosted acetate sheet which is in the kit...and its beautiful :) Finally, I've added a few buttons for added embellishment and a couple of slightly dodgy photos! he hee
Also, its been my cousin's 4th birthday this week...and so I've made him this card {he is bonkers for cars!!}

This is made from the HOTP Boys to Men Kit. I've also die cut letters from the Friendly Felt that we've all gone berserk for, and used one of the gorgeous charms from this selection. The ribbon on the tag is from the gorgeous Bo Bunny selections.
OK, that's all for now folks...hope you're all keeping warm and cosy...and checking out the specials in the webshop...there are some amazing bargains to be had!!
And have you entered this week's challenge yet? You have until Saturday...and as they say...you've got to be in it...to win it!!
Wednesday, 21 November 2007
Back to Christmas....
 Here's a suspension style card that I've made for Christmas. I covered a blank card with some of the gorgeous Bo Bunny homespun - Frost. With the Bo Bunny homespun - stripe 12x12 card I accentuated the card by making the stripe down the side, the scallop frame and the background for the Noel. This cardstock really is gorgeous and there is 20% off all the Bo Bunny cardstock at the moment. For the scalloped spinner I used a Bo Bunny bauble sticker to co ordinate with the card. I also added an acetate bauble strip and the acetate Noel which is from a HOTP Christmas kit. To finish off I popped on the gold brads.
These two Bauble style cards are so easy to do and you can give them as cards but then they can be used as a decoration for a Christmas tree.
So all I did was find a bauble template on the internet and cut it out using some A4 card. More money saving as the Crop 'til you Drop webshop has 25% off all card too!!
Next I cut out some a strip from the Bo Bunny Jack Frost - Flakes and another strip from the Bo Bunny Homespun - Toile and adhered them to the centre of each bauble. Then two lengths of ribbon were added to each bauble and a loop of each ribbon to make the hanger. I used some brads to add decoration. And finally for the sentiments I used the HOTP cardmakers Christmas Fragments.
I really enjoyed working with the Bo Bunny range of 12x12 cardstock, it's gorgeous and don't forget you'll save money too as all the Bo Bunny cardstock has 20% off!!
Subscribe to:
Posts (Atom)
