
Have you heard yet? I'm gonna close the webstore ... for good this time. It's been a long hard decision to make ... but it is time to move on.
We will be closing on November 30th & I'm not renewing my web hosting, so the site will disappear completely on Dec. 1st, I think. This blog will stay online for a li'l while at least ... we have to announce the followers draw winners in December for a start.
I hope you'll all stay in touch ... either by following me on my personal blog (if you aren't already!) or joining me over at the Misi store & forum (or both) ... Oooohhh! & come check out my Mum's new Stampin' Up! Blog ... I helped her with the blog (she's technically challenged) & will be posting projects & tutorials for her (playing with her stash, of course!).
Be sure to check out all the offers at the webstore before the end of the month ... last chance to buy! There's tons of stuff at up to 75% off RRP & 20% off everything when you spend £5 or more. As the shopping cart is throwing a hissy fit right now, you'll need to fill your basket & then e-mail it to me. I'll process it manually & send you a paypal invoice.
Christmas Countdown Clock Widget
Saturday, 22 November 2008
Friday, 21 November 2008
Christmas Flower

Today I challenged myself to make a christmas card using up some un-christmassy stash. I covered the background of the card with some paper from the March PS kit and stamped over it using a christmas text stamp and silver ink. I then wrapped some yummy american crafts ribbon around the card and fixed it on the inside by stapling it to itself. The embellishment is made from one of the flowers from the september scrapjunkie embelishment kit which I coated with some silver glitter glue. The centre of the flower is a circle cut from some felt from the same kit and secured with a brad.
Don't forget that there is 20% off in the store right now, check out the details here.
Sunday, 16 November 2008
Got A Crush On Fancy Pants?
Loved working with Deanne's new sketch ... although it did take a li'l while to get everything to come together. I really wanted to shabby everything up for this one, so I had a bit of a play with some different techniques.
 I used papers from Fancy Pants Crush line & the ledger paper is Holly Jolly. I sanded the edges of all the papers & for the journaling mat I used a distressing tool (remember the Making Memories distressing kit???) to shabby up the right hand edge - I created the torn notebook effect on the left edge by making holes with a cropadile & then tearing out from the holes to the edge ... then I inked it all up!
The photos were cut leaving a white border, roughed up with the distressing tool & then inked. I machine stitched the ribbons in place ... check out the printed leaves twill - it's Cosmo Cricket ... from the Mr Campy line.
I inked the chipboard flourish with olive pastel chalk ink (love chalk inks) & then aged the edge with chestnut roan chalk ink. The 'stems' were painted with crackle paint & then aged with chestnut roan too. I added a twist of rusty wire (scrapbook safe stuff that I've had lying around for 3 years!!) & the blossoms are made up from Prima Artful Collage, Kaisercraft (taupe)& self adhesive pearls (I used Blush)
I broke out the acrylic paint & my old foam stamps for the title ... haven't used them for ages either! If you got the september embellie kit, you'll have one of these fabric tabs (to the left of the bottom left photo) too - i just swiped with a bit of ink to make it look less 'new'
 I used papers from Fancy Pants Crush line & the ledger paper is Holly Jolly. I sanded the edges of all the papers & for the journaling mat I used a distressing tool (remember the Making Memories distressing kit???) to shabby up the right hand edge - I created the torn notebook effect on the left edge by making holes with a cropadile & then tearing out from the holes to the edge ... then I inked it all up!
The photos were cut leaving a white border, roughed up with the distressing tool & then inked. I machine stitched the ribbons in place ... check out the printed leaves twill - it's Cosmo Cricket ... from the Mr Campy line.

I inked the chipboard flourish with olive pastel chalk ink (love chalk inks) & then aged the edge with chestnut roan chalk ink. The 'stems' were painted with crackle paint & then aged with chestnut roan too. I added a twist of rusty wire (scrapbook safe stuff that I've had lying around for 3 years!!) & the blossoms are made up from Prima Artful Collage, Kaisercraft (taupe)& self adhesive pearls (I used Blush)
I broke out the acrylic paint & my old foam stamps for the title ... haven't used them for ages either! If you got the september embellie kit, you'll have one of these fabric tabs (to the left of the bottom left photo) too - i just swiped with a bit of ink to make it look less 'new'
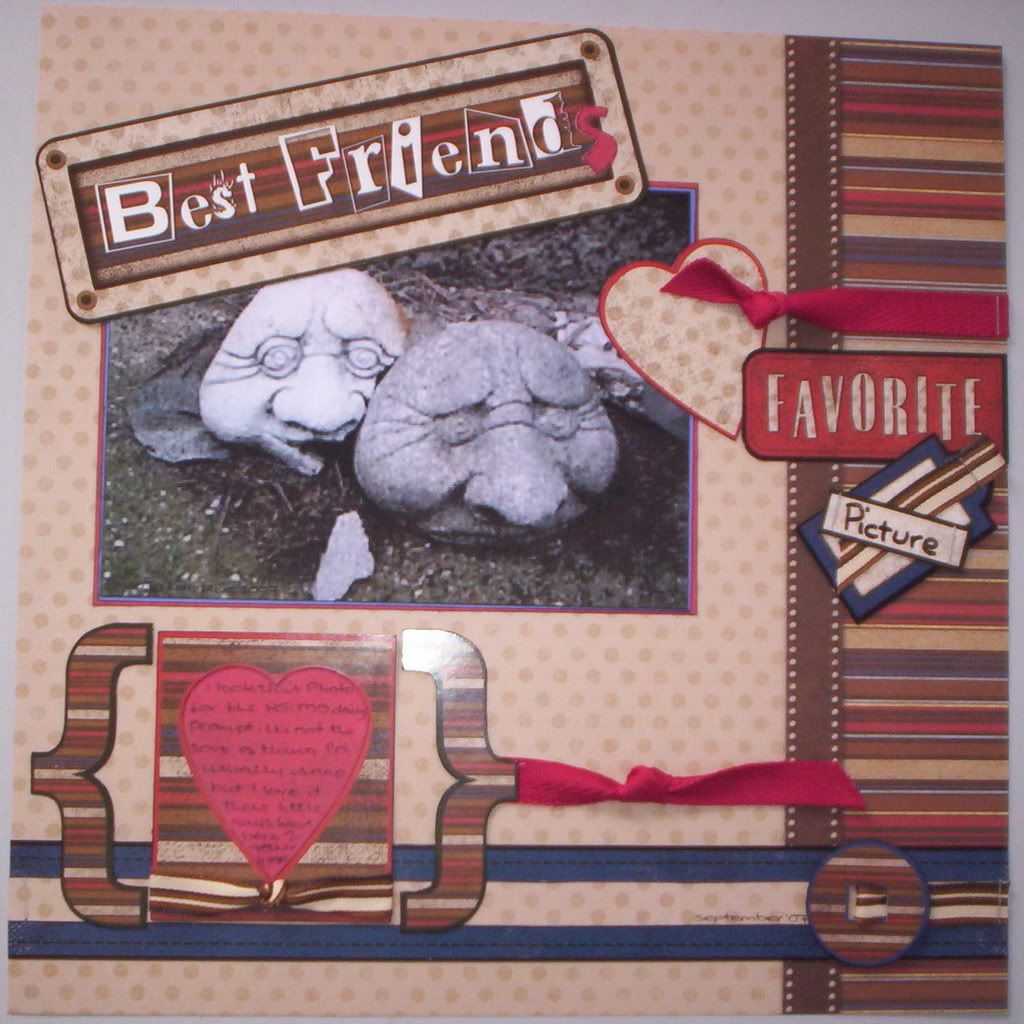
Friday, 14 November 2008
Play time
Meet Megan, a crazy dog who likes sticks - the bigger the better!!

For this layout I used patterned paper from the March Personal Shopper Kit. The matching title letters also came from the same kit. If you haven't tried these kits yet then check them out. They are currently on offer at less than half price, so with the additional November discount they're an absolute bargain! Each kit is packed with coordinating papers, embellishments, ribbons and brads along with a handy booklet full of suggested layouts and other projects. They'd make a great gift for someone just starting out with scrapbooking.
To create this layout I gutted the centre of my background paper and covered the hole with another sheet of patterned paper. I then doodled lines to make a border around this sheet with a blue felt tip pen. I matted the main photo onto the piece of patterned paper I had cut away, drew a scalloped frame around the photo and cut it out. The background of the second photo was very distracting so I cut around Megan's outline and attached the photo directly to the layout.
Monday, 10 November 2008
Xmas table L/O
Today I have made a L/O and its all about my last years xmas table !

I have used Coredinations cardstock and sanded just in from the edges in a rough square shape . A patterned paper mat from THIS paper Then i've used one of the Guvs lovely felted Journalling blocks And have glittered the edges to make it more festive.
I've also used felt lace theres a huge selection here and yellow chipboard stars that i've painted white. A few added Liquid pearl dots , some blue ink and NO TITLE (didnt think it needed it) !!!! Oh not to forget the ribbon I stapled straight onto the cardstock that was in a kit.

Saturday, 8 November 2008
MY LOVELY ALPHAS IN A TIN
Here I've made a L/O for a pink challenge but I've used the Alphabet in a tin HERE but mine was a Pink version ! They are a good sized font (i have used 12"x12" and ideal for a title .I've rubbed them straight onto textured card stock too and they work a treat . There are tons of letters in the tin so you will be able to spell the word BUBBLE etc. without buying two packs !!! (long story) :D 
Message from the Guv: Don't forget we have an additional 20% off everything all month long ... which makes these alphas (I have them in every colour! LOL) even better value. Just use the code NOV2008 at the checkout!!
x JAY x

Message from the Guv: Don't forget we have an additional 20% off everything all month long ... which makes these alphas (I have them in every colour! LOL) even better value. Just use the code NOV2008 at the checkout!!
Friday, 7 November 2008
christmas is coming...


Christmas cards from me today using some of the self adhesive felt ribbon from the September Embellishment Kit. On the first one I teamed the felt with black and holographic cardstock for a funky look. On the second I used Cloud 9 Mint Cluster paper and a white card blank for a frosty feel.
If you haven't checked out the Scrapjunkie embellishment kits you really should, they're packed with goodies perfect for all kinds of projects.
Thursday, 6 November 2008
Do you follow us??
I know we have a whole bunch of regular visitors, so I've added the li'l 'followers' gadget to the blog. Sadly, it's looking a bit sad right now ... so come on over & let the world know that you are following us!
I'll be doing a random drawing at the end of the month from all our followers & sending some luscious goodies out. There's no telling how many li'l prizes there might be ... let's see how many followers we have first! LOL.
Oh! I guess I should say, international followers are also very welcome!!
Check out my blog too - there's another random drawing there for followers!
Tuesday, 4 November 2008
17 Ways to Say 'Thank You'

Deanne posted a fabulous sketch or two a couple days ago & I thought this one was just right to make a whole bunch of Thank You cards. Normally I create one-off cards but as I include a li'l thank you with every order at the webstore, I get through a lot! LOL.
The benefit of batch-making cards is you can create them assembly line style ... completing one step at a time on several cards. I make 5-10 at a time, using whatever scraps I have on hand. Why not have a go yourself & get ahead on all those thank you cards you'll need for the gifts received & party hosts over the Christmas holidays.
 For this particular bunch of cards, I've used scraps of Bo Bunny Teen Chic & Fancy Pants Holly Jolly papers, Felt flower washers (included in this embellishment kit) & the yummy paper flowers from KaiserCraft ... these are such fabulous value as the 2cm & 3.5 cm ones (as used here) both come in a pack of 50 - so you can use loads without breaking the bank!!! That li'l pearl centre in the close up? Kaiser self adhesive pearls (I used Rose) ... bling without the mess & hassle of glue - I love them!
And just in case you missed the news ... we have 20% off absolutely everything all month long (including sale & clearance stuff already discounted!) ... Just use the code NOV2008 at the checkout (UK only ... sorry international friend-type guys!) You can use the code as many times as you like, all month long (which is great as we keep adding new stuff! LOL) & pass it on to your friends too.
Monday, 3 November 2008
Xmas card using nothing but ....
....The Embellishment kit and of course a piece of cardstock. This card is really simple , I've had it on my shelf for a week or so and everyone likes it that have visited. All I've done is cut two tree shapes from the felt, a scalloped mat & used the alphabet supplied its suede :D .
I really like the simple touchy feel of the card, There is alot of Embellishments in the kit so you have tons more embellies to use however you wished , You could also make place cards with the little bright trees .
oh the baubles on the trees were the punchouts in the mini tags so ive used things i might of thrown away before too !!!!
hope you like ,
x Jayne x
.jpg)
Saturday, 1 November 2008
Celebrate the Season

Well we are finally back after our little break, all refreshed and ready to go. Have you missed us??
I am going to kick things off with a challenge. Because I love autumn so much, I challenge you to celebrate the season!! Create something with an autumnal theme. Scrap your autumn pictures or use the colours of autumn as inspiration for a card. Perhaps even create an autumn themed altered art project.
I have created a layout with one of my recent photos. I used a sheet of white bazzill cardstock as my base. The patterned papers are yummy american crafts which came out of the 12x12 lucky dip. The leaves and the word autumn were cut from the reverse of some of the papers and doodled on with black marker pen. The rest of the title is made up of colour rubz alpha rub ons. These rub ons are fab value for money as you get loads of each letter in two different colours all in a cute little tin (they go on perfectly as well even onto photos). Finally to finish off I made a photo corner from a piece of felt from the september scrapjunkie kit and some brads.
I can't wait to see what you come up with...
Guv here! Just popping by to say, we will have a random drawing for the winner(s) this month. & there'll be shopping vouchers for our store up for grabs!! how many & how much is totally up to you. More entries means more vouchers/£££!! So spread the word!!
Guv here! Just popping by to say, we will have a random drawing for the winner(s) this month. & there'll be shopping vouchers for our store up for grabs!! how many & how much is totally up to you. More entries means more vouchers/£££!! So spread the word!!
Friday, 24 October 2008
In Luuuuurve With Kaiser!!
 I love Kaiser & have finally taken the plunge & decided to stock this fabulous Australian manufacturer's lush lines. Brand new is the gorgeous Blushed range: Pinks, black, white & soft grey. From the top: Desire, Devotion, Passion & Romance
Perfectly lovely papers for weddings, romance, teen, BOM & anywhere that you want girly elegance - love them!!
& Great For Card Makers Too!!!!!


Thursday, 23 October 2008
Kaiser in Da House!!
 Or, more specifically, in the webstore. Yup! When we re-open on November 1st you will find a whole bunch of luscious new goodies from Australian manufacturer Kaisercraft - check out just a fraction of them here ...
yummy wooden shapes for scrapbooking, card making & altered arts: paint 'em, ink 'em, leave 'em bare, add glitter, add flock, embellish with rhinestones & pearls - the list goes on. Loads of yummy shapes & words to choose from!

Flowers, flowers, flowers ... Three different sizes of shaped paper flowers ...
from just £1.99 for a pack of 50 li'l ones & in white, taupe, pink, dusky pink & cream. Each size is a different shaped petal - these are gonna look great layered together, clustered or on their own!! The sizes are: 2cm, 3.5cm & 5cm


Self adhesive rhinestones & pearls. We all love a bit of bling but maybe sometimes it's just too much hassle to try and stick them down. Kaiser's Rhinestones & Pearls are self adhesive - simple to use & hassle free! Each pack contains a variety of sizes ... imagine the possibilities!! & if that's too much hassle, check out the self adhesive rhinestone shapes!
You might have noticed a bit of a colour theme going on with the pinks, whites & black? Want papers to match? You'll just have to pop back tomorrow to see a fabby new double-sided paper range then!
Wednesday, 22 October 2008
Got Cosmo?
The webstore re-opens on November 1st, with some yummy new stash & looooads more clearance offers! Just check out the Cosmo loveliness below ...
 House album
 Jack's World
 Mr Campy
 Haunted. Yup! I know Halloween will have been & gone ... & Haunted products will be on sale for 30% off RRP - get 'em in for next year or get creative for all-year-round spooky fun!
 Gracie's Album
 This is just a li'l sneak peek at all the yummy Cosmo Cricket product that will be available on November 1st!! Exciting huh?
Wednesday, 8 October 2008
Taking a Break
Ohhhhhh! It's been a busy month or two at Crop 'Til You Drop & it's time to take a pre-Christmas break! There are sooooo many things that need tidying up on the webstore & a whole bunch more goodies - both new items & sale stocks that need to be added - the only answer seems to be to close for a li'l while until we catch up with ourselves.
The DT girls are going to take this opportunity to have a li'l break too - but will be back on this very blog, November 1st with lots of fabby new ideas to inspire & inform you all.
We hope you will all join us back here then - there might even be a RAK or two ;o)
The DT girls are going to take this opportunity to have a li'l break too - but will be back on this very blog, November 1st with lots of fabby new ideas to inspire & inform you all.
We hope you will all join us back here then - there might even be a RAK or two ;o)
Thursday, 2 October 2008
Thanks!
 For this card I used some of the gorgeous Cloud9 Designs Cocoa Mint range. The papers I used here are Simple Stripes and Mint Swirl. The topper is a Heidi Swapp Mirror Bird (there are also mirror butterflies and flowers available) which I layered on a piece of brown felt from the September Scrapjunkie Kit. I edged the felt with a gold pen for an extra bit of bling. To finish the card I used a strip of American Crafts Ribbon and some Cosmo Cricket So Precious Rub Ons.
Monday, 29 September 2008
Hoppy Birthday

I love Brad Buddies and this little froggy from the March Personal Shoppers Kit is so cute! The frame he is on is one of the toppers from the kit. The two background papers are out of the same kit and so is the strip of plain green paper that I put through a paper ribbler to create a "faux ribbon" effect. The greeting was stamped using alphabet stamps and acrylic paint.
Tuesday, 23 September 2008
Wedding Card
 For this card I used one of the Die Cut Chipboard Doves which I painted in pearlescent paint and added a crystal for the eye. For the base of the card I used a piece of sand coloured cardstock from the March PS Kit and a piece of White Bazzill which I embossed and then lightly inked with a Silver Pigment Inkpad to give a little bit of shimmer. I then mafe a border using some gorgeous Making Memories Velvet Ribbon (check out the full range of MM ribbons here)
Saturday, 20 September 2008
Christmas cards
 I know it may seem a bit early to be mentioning the dreaded C word but for once I'm trying to be organised. Usually I'm still making my cards on christmas eve, but hopefully not this year. I'm planning to make a couple of cards each week so for once I'll have them all done in plenty of time.
I have been playing with the plain cardstock from the March Personal Shopper Kit. It has a white core which makes it perfect for distressing. For the toppers of the first two cards and the background of the third card I used some of the purple cardstock from the kit. I embossed it and then sanded it to reveal the white core and make the designs stand out.
When I first looked at the patterned papers in the PS kit I thought what lovely summery papers, but actually the purples and blues are perfect for christmas too! Pretty much everything used here came from the kit apart from the piece of White Bazzill Ric Rac (check out the other colours of ric rac available here)
Friday, 19 September 2008
ANOTHER DR SEUSS from me this time xxx
.jpg)
DR SEUSS
I have made a L/O using these colourful papers Eggs and ham & The places we go . i knew exactly what photos i was going to use ,seeing my daughter loves the Dr seuss books.
Firstly the cardstock was plain white 12" x 12" HERE .I added the cut out words all around the edge and a simple ABCDE as the title Some added stickers for the cats speech bubble You can buy these here too they are clear stickers. Just to add even more colour ive added some Brads a thing i dont use very often anymore but they look fab & bring some interest to the page. You can buy a whole range of Brads Here .
Hope you like it was really fun papers to work with and my Daughter loves looking at it.
Tuesday, 16 September 2008
I love mumwitches
 This layout is all about the fact that my mum makes such yummy sandwitches. For the base I used a sheet of White Bazzill Cardstock. I then printed out my photo A4 sized and cut it out to remove the distracting background. To make the sunburst effect I used strips of American Crafts Ribbon (I think most of these ones are 'cyan' and 'coral'). I die cut the letters for the title from papers out of the March Personal Shoppers Kit and hand cut the heart from a piece of felt out of the September Scrapjunkie Kit. To bling it up a bit I inked the edges of the heart and covered it in glitter.
 The journalling reads "My Mum makes the tastiest sandwitch's. Even if its just ham + bread + butter, she can make it taste so amazing! Everyone loves her salmon sandwitches, but for me this one sandwitch has to be the best ever. Made by my Mum in Spain - it has to be the tastiest sandwitch of my life to date. I 'heart' mumwitches - summer 2008"
Monday, 15 September 2008
I know its not my turn to Blog but seeing forum is down ....
I thought i would add a card whilst we wait to join the chat again !!!!
.jpg)
.jpg)
Lets hope the gremlins are sorted and we are up and running ASAP . Please comment on here if you need anyhelp or have queries in the mean time . Im sure Guv wont mind xxx
Heres my card .... Ive used Autum leaves papers here & here and a Tim holtz game spinner Here . Ive scalloped the top edge and inked it ... There are plenty of inks for sale here and some are reduced !!!!
.jpg)
.jpg)
Thursday, 11 September 2008
Caterpillar card

I made this card for my friends little boy who is about to turn one. His mum loves anything fun and funky so when I saw the pompoms in this months Scrapjunkie Embellishment Kit I just knew what I had to do with them!
If you've not had a look at these new kits then check them out. This months kit is titled Can You Feel It? and is full of yummy textures. There's velvet ribbon, lace, felt, grungeboard and the coolest ever 'leather' alphabet stickers. I've done nothing but stroke since I got my hands on it all!
Anyway, back to my card. I used a sheet of KI memories paper from the Lucky Dip as my background. I then worked out where my bug was going and pierced holes at either side of each pompom. The pompoms from the kit have a little tube running through the middle of them so I threaded them with wire and wired them on to the card rather than trying to glue them on (much easier and neater as I always get in a mess with glue, lol).
To make the bug's legs I cut very thin strips of lime green felt from the kit and threaded this through the hole in each pompom. I finished off my bug with a couple of eyes made from white card and a couple of adhesive gems and a mouth cut from fuchsia felt from the kit.
To give an added bit of interest I made a tab from a bit of American Crafts Ribbon which I attached with three brads.
Finally for the greeting I hand cut a large '1' from blue felt from the kit (handy tip - white journalling pen is great for drawing your design on the felt before cutting out). I then added the word 'today' using the Color Rubz Rub Ons in yellow/orange. I love these so much, you get loads of each letter with two different colours in each set and they come packaged in their own cute little tin. To make me like them even better, they're on offer at the moment in loads of different colours!
Saturday, 6 September 2008
A Card for you Today
I have made a card this week using more papers from this personal shopper box. The chipboard shape can be bought from here i have used a butterfly. Sorry its a short post but i have visitors this weekend .
.jpg)
.jpg)
Friday, 5 September 2008
Creatures mini book

Firstly I want to apologise for the dreadful photos. Grrrr to the British weather, can't remember when I last managed to get any natural light shots of my creations!

Flicking through my photos recently I found I had a lot of "wildlife photography" dotted throughout my collection. None of these photos were particularly good shots (most taken in rather a hurry) so I hadn't used them on any layouts. When I saw the new Cloud 9 Cocoa Mint collection I knew it would make a perfect mini book to display my photos.
I made the pages from some thick card (a cereal packet) which I cut into circles and inked round the edges. I then covered both sides with patterned paper from the collection. The papers are double sided with a plain colour on the reverse so I made one side of each page patterned and the other plain.

I journalled directly onto my photos in photoshop before I printed them out, with little arrows pointing to the creature. I inked round the edge of each photo with brown ink before sticking them on the pages.
Finally I punched a hole in the top of each page and used a bookring to fasten them together. I decorated the bookring by knotting some American Crafts ribbon around it.
For the cover I stamped the individual letters of my title on to strips of the reverse side of one of the papers (Simple Stripes). I cut each letter off the strip and stuck them all down with foam pads. 

Finally I added two flowers cut from another sheet of paper also attached with foam pads for extra dimension.
Don't you just love that monkey's face? He really looks like he's enjoying that rock. He stole it from a little old lady when we were at the top of the Rock of Gibraltar!
Monday, 1 September 2008
Birdie Cards
 For this first card I used two K&Co Urban Rhapsody papers (Word Confetti and Sugar Rush) and covered the join with a piece of ribbon from the American Crafts Lucky Dip. I then cut a birdie from the Birds the Word paper and edged him in gold pen to make him stand out from the background before attaching him with foam pads. Finally I added the "hello!" greeting using some Color Rubz rub ons. They come in a wide range of colours (I used yellow/orange here) in an adorable tin and even better they're on special offer in the store right now!
 For my second card I used a piece of card from the March Personal Shoppers Kit as my base. Because it has a white core I was able to sand it to distress the edges. I then created a border using more American Crafts ribbon and a couple of American Crafts brads (which are also on offer at the moment). I cut another birdie from the Birds the Word paper and used more of the Color Rubz rub ons on a couple of scraps of the same paper for the "hi" greeting. All of these were edged with gold pen before being attached with foam pads.
Saturday, 30 August 2008
MY LITTLE MINI BOOK (inspiration)
Heres pics of my little mini book . You can buy EVERYTHING you need for it and have a mountain of stash left over to make cards , L/Os , more minibooks etc... in the Personal shopper
.jpg)
.jpg)
.jpg)
.jpg)
.jpg)
All ive done is cut and folded pages out of one sheet that had squares already. Added a few accents that matched and printed my photos super small ,with a lot of journalling . Hope you like & go on make yourself a book of inspiration.
.jpg)
.jpg)
.jpg)
.jpg)
.jpg)
Subscribe to:
Posts (Atom)
