Christmas Countdown Clock Widget

Are You Ready To Take The Challenge??

Join Elliemook's November challenge for your chance to win shopping vouchers for our store! All the deets are here

Join our followers & be entered into a random prize drawing on December 1st. Check it out!!!

Thursday 28 February 2008

Bargains...bargains...and bags!

Hi all!

A couple more ideas for you today...Firstly...carrying on my butterfly bonanza from last week...I've used more of the chipboard accents to make this cute butterfly hanger for my friend's scraproom!
The shapes were covered with pp's from the 12x12 Lucky Dip, and embellished with wire wings, star shaped brads, acrylic paint dots and some glass chips I had from a fish tank!! Its all tied together with ribbon from the satin Lucky Dip! Altogether a bit of bargain from start to finish, eh? lol

My second offering today is a bag which I've embellished. I bought the bag for £2 from a local shop and thought I'd jazz it up a bit with all the sale goodies!


I've adhered ribbon from the satin Lucky Dip in 3 colours along the bottom edge, then I attached 3 of the dark Yo-Yo's with a button and some embroidery cotton and made very long stitches to make the stems. There is a super bargain bag of buttons available here if you don't have any! Then I tied some more of the satin ribbon into 3 bows and a knot...and simply glued them on! Et voila...I have a funky new cropping bag!!

I hope you like what I've done...do leave me a comment and let me know what you think...especially if you think you might a go yourself!! And keep your eyes peeled on the webshop...there is new stuff going into the sale all the time :)

Bye for now x

Wednesday 27 February 2008

Oh My Word!!


I am totally in love with these Bo Bunny My Word Albums!! The one I've used for this project is the Party one, but they're also available in Baby, Friend and Love too - and they're 20% off in the webshop!

To cover the pages of the album I used the We R Memory Keepers Promenade papers, which are beautiful heavy weight, double-sided papers. Having covered all the pages, front and back, I sanded and inked the edges - then it was time to decorate and add some photos! I used the Promenade layered chipboard tags, some satin and organza ribbons, some cute little charms from the "party" pack and finally the gorgeous black celtic border felt fusion.

Don't forget to check out the special offers in the webshop - but be quick, at these silly prices, they're selling fast!

Monday 25 February 2008

6x6 Paper Pads for 75p???

Yep! that's right! As part of our massive clearance sale we have English Paper Company 6x6 paper pads from 75p and looooads of other bargains under £1. Be sure to check out our clearance section; special offers and new 'Pound Stop' for huge savings.
You'll find bumper packs of ribbon - Satin Ribbons:15 metres for £1.00, Bo Bunny Ribbons at 62p, Organza Ribbons: 5 Metres for £1.00.
Love stamping? Look out for A Muse stamps at under £1.50, HOTP clear stamps sets under a fiver with lots more designs still to be added.
We've got some great Deals on Fancy Pants Biggest Board, Bo Bunny 'My Word' albums & Bare Elements books at 20% off; 50% off friendly felt (our DT's favourite product!!); Stickers from 45p; Brads and charms at under £1 per pack.
Not yet tried HOTP Personal Shopper kits? Choose from Card Makers kits at £6.99 (60% off!) or Scrapbooking at £9.50 (53% off!)
We are adding new sale products every day, so be sure to check back regularly for the best bargains!

Want Free Stuff? Write a review for any of the products you see in our webstore and be entered into the draw to win £30 of goodies. It only takes a few minutes & absolutely no purchase is necessary, so why not write more than one & increase your chance of winning! The draw will take place on March 16th, so hurry if you don't want to miss out! Check out the deets here!!

Saturday 23 February 2008

Challenge # 30 - Innovative Scraps

Hi everyone it's my turn to do the challenge this week and it's "Innovative Scraps". I have lots of scraps left in a box and I didn't want to throw them away so I thought what can I do different with them. So I have made two cards and two ATCs using the papers as strips. I paper weaved with them to give them a different look.


My first two pieces are baby cards. One for a boy and one for a girl.
I used HOTP papers from a HOTP personal shopper monthly kit for all of the card. All the kits from the shop have massive reductions on them, card kits and scrapbook kits. You can't go wrong with them , there are stacks of papers and embellies in the box. And you can make soooo much with them. They even come with a little idea booklet if you get stuck for ideas!
So for the large square in the middle of the two cards I weaved two contrasting papers. I also added a strip of one of the papers to the top of the cards. I then added the text using a rubber stamp. Lots to choose from at the shop and lots of bargains to be had on these too! 75% in most cases! To finish the cards off I added a little tied ribbon to the left hand corners of the text layer.
My next two items are ATCs. Again I used papers from a HOTP monthly kit. Both backgrounds are paper weaved in contrasting papers. For the first one I added a little label covered in two papers, tearing one to add some dimension. I then added a good luck charm to a little bit of ribbon with a brad and attached it to the label. The charms are brilliant I think I've added them to almost all of my projects. And if you take a little look in the shop you'll see that they have 70% off making them 90p for 6 metal charms!! What a bargain! There are lots of different themes to choose from too. For the second ATC I again used some paper weaving for the background and added a black slide edged with a silver pen. To the middle I again added one of the good luck charms which says "Go for it" and attached it to a piece of ribbon. On both ATCs I used a button for the right hand corners. They were both originally red but I coloured the second one silver with a pen. I thought they both needed some sort of text on them so to simplify I added the "good luck" on both of them by using a Helix alphabet stencil.
Why not try an "innovative way" of using your scraps and show us all here at Blog 'Til You Drop? You could win a prize at the end of the month by emailing us and we will then put your work in our gallery. If yours is the best one judged by the Design Team you'll be winning the prize.
Don't forget to leave us a message at the end of this posting so that we can all go and see your work.

We got an award!

The marvellous Fabrizio, who has been a good friend to me through thick & thin, nominated the entire CTYD DT for this award - and I gladly accept on behalf of the team. I'll leave them to accept individually on their own blogs! LOL.
So as a team blog & with absolutely NO consultation to the rest of the team (LOL) I nominate Arty Girlz for this award. Fab challenges (which I think most of the team do) & we'll be sponsoring a challenge there early next month!
Congrats to Crissi & Julie AKA Arty Girlz and thank you Fab - you do so deserve this award!

Thursday 21 February 2008

Fun with vellum.......


Beverley sent us the most gorgeous vellums to play with in our DT pack - and I couldn't believe it when I saw the price - 10 A4 sheets for just £1!!

For the first card I attached this fun fishy vellum to the card blank with some brads. I then cut out some fish shapes from the old faithful friendly felt, added some A Muse twinkle gems as eyes and bubbles and finished off with a computer generated greeting.

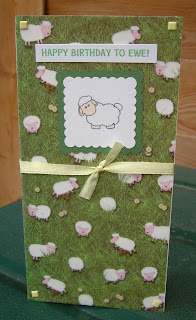
For the second card I attached the cute sheep vellum to the card blank, again with brads. I found this little sheep image on the internet, printed him onto white card and then matted onto green card. The scalloped squares were cut using Marvy punches. I finished the card with a computer generated greeting and a length of satin ribbon.

Don't forget to check out the clearance and pound stop sections for more crazy priced bargains!!

Wednesday 20 February 2008

winged things...

Hi everyone, Alix here! Have you seen these chipboard accent packs yet? They come in allsorts of shapes and themes, but this week I've been working with the wings selection...I hope you like what I've come up with :)

This is a dragonfly shape and I've covered it with paper from the Lucky Dip 12x12 selection, overlayed with two sets of vellum wings cut from the Lucky Dip Vellum selection and then wound ribbon around a kebab stick from the Lucky Dip Satin selection! I've shaped a piece of wire for the antennae and covered the body in seed green seed beads and blue glitter {sadly you can't see it in the photo...but it really shines and sparkles!} I'm going to give this as a wand to a special little girl i know...but it would equally look good in a bunch of {dried} flowers or tucked into a plant pot...anywhere really!
This butterfly shape I've made into a badge/brooch. I simply coloured it using a soft blue inkpad and stamped onto it using some shapes from the HOTP Thingamajigs set of stamps in black ink...a word of warning tho...as you can see...the chipboard is very shiny...so don't be like me...put your shape down on a flat surface if you want to stamp without slipping about!! The centres are embellished with a dot of acrylic paint , as is the body.
This last butterfly is my favourite tho...and it was the easiest to do! Again I coloured it using an inkpad, and I made antenna and a body with wire {threaded with some little polymer clay beads I made an age ago...} This time however, I decorated the body with felt shapes...you do remember how much I love felt, don't you? These shapes are cut out of the Felt Fusion heart border strip. Self adhesive, you just trim and peel...and the job is done!
Actually, I seem to be on a bit of a butterfly kick atm...and have a yummy LO to share next time I'm up!
But for now...thanks for dropping by...and go on...have a go at a winged thing yourself!!

Tuesday 19 February 2008

Girly Things

Hiya today is my turn to show you what I have made. So I've done two girly projects.


The first is a great place to hide all those little crafty receipts from your other half. ;-). It's a folder to keep all your receipts safe. I used my Cricut to cut out the folder base, but there are loads of sites on the internet where you can download free templates. I covered the base and the file dividers in the fab Creative Imaginations papers. To decorate the front I cut out some flowers from another piece of 12x12 paper from the same company and used 3D foam to adhere them. I then threaded some of the girly charms onto some ribbon and added that along the top. These charms are brilliant and are on special offer in the shop with a massive 70% off, which makes them only 90p for 6 metal charms. Bargain!! They're not only girly ones but lots to choose from.
I then added some brads down the right hand side of the folder and also one to each of the tabs on the files.


My second piece is something different to send to a birthday girl other than a card. It's a little heart shaped bag and tag.
Again I used the Creative Imaginations papers for the basic shape. Can you tell I think these papers are fab? They are also a good weight too, just right for this sort of make.
To decorate the bag I added some eyelets to the "handle" and also to the middle of the flowers. These also have 25% off in the shop.
I added the "Dance" brad buddies , which have 50% off!! to the front of the bag.
The tag was made with the same papers. And I also cut out some of the flowers from another paper in the range and used 3D foam to adhere these on. Then I just added the "Happy Birthday" text.

So there you go two ideas for girly gifts!

Sunday 17 February 2008

R U A Junkie??

We don't usually publicise other challenges on this blog - but I'm the Guv'nor so I can if I want! LOL. Journaling Junkie have a fabulous new contest at the moment with prizes!! All the deets are here. Basically, we need a bit of help spreading the word about our fabby weekly challenge blog (I get to say 'our' cuz I'm on the DT!) and a bit more participation with the challenges and stuff - I'd love you all to come and join us. Another good reason to tell you about it is: you can combine a journaling challenge there with our weekly challenges there and double your chances of winning!

Anyway, it's well worth popping on over - you gotta be in it to win it, right? And I'll love you all forever if you could pop a comment on the post here - just to say that I sent you - that's me: beverley (the guv) - & if I win - I'll have a bit of a RAK to celebrate!

The new challenge (#12) is up too - I'll be sharing my creation later in the week over on the journaling junkie blog - with a free tutorial - but it's still a bit secret squirrel right now!! You get points for entering the challenges - and more points if you win a challenge - so why not make this the week that you join in! Don't forget to combine with our weekly challenge, set by Ruth - use charms and double your chances to win. Good luck!

Friday 15 February 2008

Some quick and simple cards


For these cards I used some of the gorgeous papers from the English Paper Company, and not only are they stunning, at 75% off - they're just 13p a sheet - what a bargain!!


For the first card I covered a card blank with this paper and then painted one of the Bare Elements butterflies with pink acrylic paint and matted onto this paper. I finished the card with a length of organza ribbon (also at an amazing price!)


For the second card, I used the same 2 papers, hand cut some heart shapes from our old favourite Friendly felt and added a button. The sentiment was added with one of these bargain rubber stamps.


For this final card I covered a card blank with this butterfly paper and added a strip of the daisy paper. I added 2 more chipboard butterflies, again painted with acrylic paint, and finished with some glamour dust for a bit of sparkle!


You have to check out all the amazing bargains in the webshop at the moment, particulary the clearance and Pound stop sections - loads of bargains to be had!!

Thursday 14 February 2008

One World Winners!

Wow! Soooo many new friends to visit & a whole bunch of new visitors leaving comments here! The One World One Heart giveaway has been such fun & we will definitely be up for it again next year. Big thanks to Lisa Oceandreamer for organising the whole thing and spreading the love!
Anyway we picked our winner using this random number generator and also picked the winner for our referrer's draw in the same way. They are

Draw winner: #30 Sew Funky

Referrer: #11 Alix

Congrats to you both. Prizes will be in the post as soon as I have your snail mail addys.

Well did you??

make any Valentine cards I mean? :) I did!! and a LOVE book! There is so much gorgeous stuff in the webshop atm...I am totally in love with the Fancy Pants collections...and have used the Crush option for my Valentine card and book...If you haven't checked them out yet...get over there quick...this stuff will not hang around long!!!

This card is for my OH and is made from the Crush cardstock and embellished with the Felt Fusion borders which are just delicious {there are squillions of these to choose from and they are already self adhesive so super easy to stick down!}

To go with the card, I've made a mini-album using the Bo Bunny Love chipboard album...again there are several of these to choose from and they are currently 20% off!! I've decorated mine using 4 sheets of the Crush cardstock, the co-ordinating die-cut tags, and lots of ribbon from one of the Lucky Dip bags which are only £1!!!!

Apart from this, I've added photos, penwork, inked the edges and used a heart charm {these charms are also part of a huge selection which are on a phenomenal deal atm only 90p a pack!!! I think the Guv has gone a bit mad myself...they are a crazy 70% off and they are sooo sweet...perfect for all sorts of occasions and projects!}


Finally, I've made a card for my MIL2be to give to her OH :) This uses the heart vellum from the Lucky Dip selection, another of the heart charms and some more of the ribbon from the Lucky Dip satin selection. I've made the little frame from a slide mount embossed with twinkly powder, just to add a bit of bling! lol

I have really loved working with all these products...and I would recommend them to any one...and just in case you haven't noticed...we have a Pound Stop now...where you can get some amazing bargains...do be sure and check it out! We all love stash, right?
Happy Valentines' Day...Alixxx

Wednesday 13 February 2008

Dad's Album

With all the Mother's day and Valentine's day cards and gifts going round I thought I'd do something different. So today I'm showing a little album that you can make for your Dad . It doesn't have to be for a Dad it could be for any male relative.

For the "pages" I have used the giant playing cards. The front page is covered with a paper from the Christmas 2006 HOTP kit. So it is quite versatile and not just for Christmas. The strip of transparency is also from HOTP. I added a little beer mug with a tiny little safety pin to the strip. The beer mug is from a set of charms, there are 6 in a pack and ... they are only 90p as they have 70% !!!! off. To add the title I cut out some of the circle letters and added a brad to adhere them.


For the 2nd and 3rd pages I again used some papers from the Christmas kit. I used the computer for all the text. On the 3rd page I used some of the lovely black glimmer paper and again added a charm with some ribbon. The little photo corners are made by cutting some triangles from a square of fabric swatch sticker. And just to let you know the fabric stickers have 75% off so they are only 45p!!!


Again the 4th and 5th pages were covered in the Christmas kit paper. The 4th page I added another fabric swatch sticker for a photo to go on. Another charm which says "beer beer" and that is held on by some ribbon and a brad too. And guess what the brads have 50% off too!! For the 5th page I cut out a rectangle so that some of the playing card showed through. I added a square piece of co-ordinating paper and cut out a spade to add to the corner. To finnish off this page I added a little silver domino. So this would be the "games" page .

For page 6 I again used the papers from the Christmas kit adding a strip of the fabric swatch sticker to the top. I then added some HOTP copper charms with the theme of travel. Page 7 was covered with the black glimmer paper but I cut out a circle so that the 8 of the playing card showed. I again added a transparency to the bottom and finally added some metal buttons.

To hold the album together I punched two holes and tied it all up with some ribbon.

With all the bargains to be had in the shop it works out to be a very inexpensive gift.

Tuesday 12 February 2008

Papers are for life, not just for Christmas!


Who says Christmas ranges have to be used just for Christmas projects? Check out the gorgeous Holly Jolly Range by Fancy Pants - and don't let the name fool you - they're very versatile!!


When Guv sent us our new DT kits - I just knew that this Giant Butterfly from the CI Bare Elements Dimension pack was destined to be a wall hanging for my craft room! These packs are on special offer at the moment - and you get 3 12 x 12 sheets full of shapes too!


For this project I covered the Butterfly with the Snowflake paper from the Holly Jolly range, and then die cut my name from the Merrie Merrie paper. I added a butterfly and a heart from the die cut sheet and then added some flowers and a crown from the Fancy Pants Fashion Sense Felt (With Love) fabby little felt die cuts and you get LOADS in a pack!


For the actual hanging part, I plaited together 3 lengths of satin ribbon from this amazing clearance pack - 15m of ribbon for just £1!!

Monday 11 February 2008

I'm in the Mood For LUUURVE!

I found out about this fabulous event through Adriann, who commented on my blog & really wanted to take part in it - so much so that I thought the store could do with joining in too.
The rules are simple enough:
Leave a comment on this post by 10am GMT on February 14th. Please also make sure that I have a way to contact you, either through your blog or leave me an e-mail address.
I will use a random number generator to pick the winner from all the comments on this post and announce it the same day.
This draw is open to everyone, whether or not they are hosting a giveaway for One World - One Heart or not (& yes DT, that means you too! LOL).

The winner will receive: A4 vellum, peel offs, charms, ribbon, a rubber stamp, card blanks, a pack of Inktense pencils and a storage box to keep it all in! It's all wrapped & tied with a red bow - ready to pop in the post to the winner.

I'll also do an extra draw for some surprise goodies for anyone who brings their friends over. So for every comment that mentions the name of the person that sent them here, that named person will go into a separate draw. I'll announce the winner of that draw on Valentine's day too!
Good luck everybody ... & spread the Luuurve.

Saturday 9 February 2008

Challenge #28 - I'm in the mood for love.

The DT Gals have finally let me post a challenge of my own - and about time too! LOL. So here goes: As it is Valentine's Day next Thursday the challenge is simply to create something on the theme of love - could be a card, layout, altered item, ATC - cupcakes even!

Next, e-mail us a piccy to put in the challenge gallery (and possibly to feature in the link here on the blog) THEN post a comment so that we all know that you've taken part & can go take a look in the gallery. At the end of each month, the DT vote on their favourite from all the entries to win a prize!

Feel free to put a link to your blog in the comment but you must e-mail the image to us as well!

To get you in the mood (as it were!) here is a li'l gift box I've made for my upcoming class over at MCC. So if you want the instructions etc - you'll have to join me there! All the materials are from the Personal Shopper February 2007 Kit, which is on sale in the webshop now.

Be sure to pop back again tomorrow - there's a li'l announcement coming up!

Wednesday 6 February 2008

Kids & Layouts

Hiya. Well I'm not much of a scrapping kind of girl but..... I just couldn't bring myself to cut these fab papers up too much!! If I'd have made anything else it would have meant cutting them up and then you don't get to see just how lush they really are.
So this first one is of my daughter at her leaving assembly. Though she hasn't really left she is in the 6th form now! I used the Creative Imaginations - Renae's House for this layout. They are double sided so I used the stripe side as the base and then added a torn off strip along the bottom from the other side of the paper. Sacrilege, I cut out some of the flowers from another sheet of paper from the same range and used 3D pads to stick them on so they would stand out. I also added some red buttons so that they could co-ordinate with Sigourney's top. Along the bottom of the torn strip I added some red and white spotty ribbon to co-ordinate again. The title is computer generated.

The next layout is using a recent school photo of my two youngest. I loved the sepia photo best. Don't they look angelic? Not always like that though!
For this one I used the American Crafts Bookshelf range. To add a bit of detail to the paper I added a strip of contrasting paper , again from another sheet of the Bookshelf range. To cover the joins I stuck a strip of ribbon on the top and bottom, which I think went really well with the circle and stripe paper. Then to add a fun touch I stuck buttons onto the circles, trying to match up the same colours. The little rub on words "hug" and "pal" seemed just right for this layout. (just to let you know these rub ons are great value as they are in the shop with 50% off!!!!) And again the text was computer generated.

And if you are thinking that I've used a lot of buttons well... for only £1 a bag, how can you go wrong????

Quite simple to do but I think really effective!

Tuesday 5 February 2008

Let's kit together!


I love the HOTP Personal Shopper kits - everything you need in one box and all perfectly co-ordinated for you!


For this LO I used the February 07 kit. I used a plain paper for the background, a couple of lengths of the patterned paper, some ribbons and the gorgeous crocheted trim. The little circles come from the artwork sheet in the kit. The "family" acetate overlay is also from the kit, and I attached this to the photo with brads. I then added a doodled frame, and some doodling in the bottom corner.


You can purchase this kit from the webshop HERE (and at an amazing 25% off!!) And if you want some more inspiration on how to use it, why not check out Guv's class over at My Creative Classroom? It starts on February 14th and runs for 6 whole weeks. It includes tons of projects, all from this one kit, including scrapbooking, cards and altered items. You can find all the details HERE.

Saturday 2 February 2008

Challenge #27 - Make your own embellishments!

Hi everyone!

Remember the days when crafting was about *making something* out of whatever you had to hand? Well this week I've gone a bit nostalgic...and I'm putting aside all those beautiful ready made embellishments in favour of something I've made myself...

My challenge to you is to do the same! You can enter a card, a LO, an altered item or an ATC...but the embellies must be all your own work...and not *bought*, OK?

Here are some ideas to get you going:

My first card is really far down the nostalgia track...its embroidered fuschias...done with an eyelet hole punch and some HOTP sheer ribbons from the Classic Collection {plus some green which I randomly had!} The greeting is from the HOTP word fragments.


My second card is a handmade shaker box card, made from a HOTP slide mount and two little pieces of acetate left from the HOTP acetate overlay we had months ago!! I've covered a blank card and the slide mount with pp's from the Boy to Men Busy Scrappers set, added a little chunky crystal glitter to the inside and a cute charm to the outside. I've also popped an offcut of ribbon from the HOTP Citrus Embellishment set and 4 gold square brads onto the box. Finally, I've drawn around the box and written my sentiment in by hand...do you remember hand writing? lol
How about a bunch of flowers to cheer the day along? These flowers on sticks {and hearts and butterflies too :) } are in all the shops atm...and I love them! Here I'm showing how many different styles of flowers you can make from just your offcuts of pp, a felt pen and some odd brads and charms. The large brads are the HOTP Really Big Brads. You could also use, felt, buttons, bottle tops...anything you like the look of to make the centres...let your imagination go wild!

Finally, I've made and embellished a box to give my loved one his favourite biscuits in on Valentines' Day. :-x I've used the same Boys to Men pp's, a HOTP alphabet sheet, some heart shaped brads from the Cooking set of Brad Buddies and a pair of scissors! Pretty cute, huh? :)


Ok, so you've seen my examples...do join in the Challenge and let me see what you can do. Simply e-mail your entry and then comment in this post to let us all know your work of art is in the gallery to be admired.
Good luck...and remember to check back at the end of the month to see if you are Feb's Challenge Winner!!


Friday 1 February 2008

Check out MCC!!

WOW! I have been spending loads of time over at My Creative Classroom this week where our very own Guv is teaching! There are loads of free classes, tips, techniques, competitions and chats going on all the time and have I been having some serious fun!! I have made absolutely loads of stunning stuff. The hard bit is deciding what to show off first!!

First one, was this page using gathered flowers, I love making these and these were just strips of old torn material. I used Creative Imaginations Paper Drop Dead Red, a HOTP Great Big Brad with a Great Big Brad rub-on and some buttons for the flower centres.
This was a fantastic technique and I will definately be doing more of these in the future!
Incidentally, my beautiful boy isn't at all dangerous unless he's hanging off your finger!! LOL! Bless him!

This card was also for the gathered flowers I used a piece of organza ribbon for the flower this time and the card itself was made from the HOTP Personal Shopper Kit December 06, I LOVE that brad that came with it, these kits are amazing, I STILL have loads left!! Think I will go and find some more classes to do!

This little giftbag was for one of Beverley's classes, using a patchwork technique, you can all the information and template over at MCC. I used Renae's House Aubrey papers, this one is Blossom, I used a lilac gel pen for the stitching, added a little charm, a scrap of ribbon and a sticker that I found at the back of the drawer!!


Next week Beverley is doing a kit class (can't wait!) Lets Kit Together: LOVE class using the HOTP Personnal Shopper Kit Feb 07 (and it's on sale in the webshop!!!) It looks really good, will definately be doing this. Have a look over at My Creative Classroom for more information.